Category: Blog

  • React-CounterApp

    Getting Started with Create React App

    This project was bootstrapped with Create React App.

    Available Scripts

    In the project directory, you can run:

    npm start

    Runs the app in the development mode.
    Open http://localhost:3000 to view it in the browser.

    The page will reload if you make edits.
    You will also see any lint errors in the console.

    npm test

    Launches the test runner in the interactive watch mode.
    See the section about running tests for more information.

    npm run build

    Builds the app for production to the build folder.
    It correctly bundles React in production mode and optimizes the build for the best performance.

    The build is minified and the filenames include the hashes.
    Your app is ready to be deployed!

    See the section about deployment for more information.

    npm run eject

    Note: this is a one-way operation. Once you eject, you can’t go back!

    If you aren’t satisfied with the build tool and configuration choices, you can eject at any time. This command will remove the single build dependency from your project.

    Instead, it will copy all the configuration files and the transitive dependencies (webpack, Babel, ESLint, etc) right into your project so you have full control over them. All of the commands except eject will still work, but they will point to the copied scripts so you can tweak them. At this point you’re on your own.

    You don’t have to ever use eject. The curated feature set is suitable for small and middle deployments, and you shouldn’t feel obligated to use this feature. However we understand that this tool wouldn’t be useful if you couldn’t customize it when you are ready for it.

    Learn More

    You can learn more in the Create React App documentation.

    To learn React, check out the React documentation.

    Code Splitting

    This section has moved here: https://facebook.github.io/create-react-app/docs/code-splitting

    Analyzing the Bundle Size

    This section has moved here: https://facebook.github.io/create-react-app/docs/analyzing-the-bundle-size

    Making a Progressive Web App

    This section has moved here: https://facebook.github.io/create-react-app/docs/making-a-progressive-web-app

    Advanced Configuration

    This section has moved here: https://facebook.github.io/create-react-app/docs/advanced-configuration

    Deployment

    This section has moved here: https://facebook.github.io/create-react-app/docs/deployment

    npm run build fails to minify

    This section has moved here: https://facebook.github.io/create-react-app/docs/troubleshooting#npm-run-build-fails-to-minify

    Visit original content creator repository
    https://github.com/ecrossreyes/React-CounterApp

  • civitas

    Civitas

    Civitas

    Civitas is a web map application that allows you to visit new cities and places by flying smoothly and randomly all around the globe.

    Let’s start visiting new cities here!

    ⚠️ Important! Civitas is not optimized for mobile devices yet, so if you check it with your phone the experience could not be as expected.

    Build With

    This project was generated with npx degit maptiler/svelte-template-maplibre-gl-js

    Development

    Prerequisites

    npm install npm@latest -g

    Setup

    Clone the repo

      git clone https://github.com/fmariv/civitas.git
    

    Navigate to the newly created project

      cd civitas
    

    Install the NPM packages dependencies

      npm install
    

    API keys

    Rename or copy the .env.example file to .env

      cp .env.example .env
    

    Open the .env file but ⚠️ you will need to insert your own MapTiler and RapidAPI API keys.

    ℹ️ If you don’t have a MapTiler API key, you can create it for free here. If you don’t have a RapidAPI API key, go there.

    Run

    To start your local environment, run:

      npm run dev
    

    You will find your app on address http://localhost:5000/.

    Now you should see the app in your browser.

    Build

    To build for production, run:

      npm run build
    

    License

    Distributed under the MIT License. See LICENSE for more information.

    Credits

    Favicon credits to Freepik in Flaticon.

    Visit original content creator repository https://github.com/fmariv/civitas
  • LazyWinAdmin_GUI

    Visit original content creator repository
    https://github.com/miroslavvidovic/LazyWinAdmin_GUI

  • github-pages

    Astro GitHub Pages Template

    🤖 Automatic Deployment to GitHub Pages

    This minimal Astro project template comes with a GitHub Action that automatically deploys your site to GitHub Pages.

    For more information, please see our complete deployment guide—Deploy your Astro Site to GitHub Pages.

    🚀 Project Structure

    Inside of your Astro project, you’ll see the following folders and files:

    /
    ├── public/
    ├── src/
    │   └── pages/
    │       └── index.astro
    └── package.json
    

    Astro looks for .astro or .md files in the src/pages/ directory. Each page is exposed as a route based on its file name.

    There’s nothing special about src/components/, but that’s where we like to put any Astro/React/Vue/Svelte/Preact components.

    Any static assets, like images, can be placed in the public/ directory.

    🧞 Commands

    All commands are run from the root of the project, from a terminal:

    Command Action
    npm install Installs dependencies
    npm run dev Starts local dev server at localhost:3000
    npm run build Build your production site to ./dist/
    npm run preview Preview your build locally, before deploying
    npm run astro ... Run CLI commands like astro add, astro check
    npm run astro --help Get help using the Astro CLI

    👀 Want to learn more?

    Feel free to check our documentation or jump into our Discord server.

    Visit original content creator repository
    https://github.com/withastro/github-pages

  • file_uploader

    File Uploader

    PHP File Uploader Package

    Current version: [v1.0.2]

    Build Status Latest Stable Version License

    Installation

    Via Composer

    $ composer require clivern/file_uploader

    Usage

    First configure uploader class.

    include_once dirname(__FILE__) . '/vendor/autoload.php';
    
    $uploader = new \Clivern\FileUploader\Uploader([
        'dir_path' => dirname(__FILE__), # Path to storage directory
        'dir_name' => 'storage', # Storage directory name
        'year_storage_based' => true, # Whether to arrange uploaded file in year directories
        'month_storage_based' => true, # Whether to arrange uploaded file in months under year directories
    ]);

    Then upload and validate file

    $result = $uploader->uploadFile('test', [ # test is the file input name
    
        # validate allowed extensions
        # Possible values are:
        #   false => to stop extension validation.
        #   array of allowed extensions.
        'supported_extensions' => ['txt'],
    
        # validate allowed types
        # Possible values are:
        #   false => to stop type validation.
        #   array of allowed types.
        'supported_types' => ['text/plain'],
    
        # Maximum upload size
        # Possible values are:
        #   false => to stop size validation.
        #   1KB or 2KB or 8KB and so on.
        #   2MB or 3MB or 8MB and so on.
        #   3GB or 4GB or 5GB and so on.
        #   4TP or 8TP or 10TP and so on.
        #   9PB or 8PB and so on.
        'max_size' => '2MB',
    ]);

    Then check if file uploaded

    if (!$result) {
        # Get Errors List
        $errors = $uploader->getErrors();
    }else{
        # Get uploaded file info
        $file_info = $uploader->getFileInfo();
    }

    Explore this working example

    <?php
    include_once dirname(__FILE__) . '/vendor/autoload.php';
    
    if( isset($_FILES['test']) ){
    
        $uploader = new \Clivern\FileUploader\Uploader([
            'dir_path' => dirname(__FILE__), # Path to storage directory
            'dir_name' => 'storage', # Storage directory name
            'year_storage_based' => true, # Whether to arrange uploaded file in year directories
            'month_storage_based' => true, # Whether to arrange uploaded file in months under year directories
        ]);
    
        $result = $uploader->uploadFile('test', [ # test is the file input name
    
            # validate allowed extensions
            # Possible values are:
            #   false => to stop extension validation.
            #   array of allowed extensions.
            'supported_extensions' => ['txt'],
    
            # validate allowed types
            # Possible values are:
            #   false => to stop type validation.
            #   array of allowed types.
            'supported_types' => ['text/plain'],
    
            # Maximum upload size
            # Possible values are:
            #   false => to stop size validation.
            #   1KB or 2KB or 8KB and so on.
            #   2MB or 3MB or 8MB and so on.
            #   3GB or 4GB or 5GB and so on.
            #   4TP or 8TP or 10TP and so on.
            #   9PB or 8PB and so on.
            'max_size' => '2MB',
        ]);
    
        echo '<pre>';
        if (!$result) {
            # Get Errors List
            $errors = $uploader->getErrors();
            var_dump($errors);
        }else{
            # Get uploaded file info
            $file_info = $uploader->getFileInfo();
            var_dump($file_info);
        }
        die();
    }
    
    ?>
    
    <form action="" method="POST" enctype="multipart/form-data">
        <input type="file" name="test" />
        <input type="submit"/>
    </form>

    Change log

    Version 1.0.2
    > Initial Release
    

    Testing

    $ composer test

    Contributing

    Please see CONTRIBUTING and CONDUCT for details.

    Security

    If you discover any security related issues, please email hello@clivern.com instead of using the issue tracker.

    License

    The MIT License (MIT). Please see License File for more information.

    Visit original content creator repository https://github.com/Clivern/file_uploader
  • Grain-Packing

    An Python code for 2 dimensional grain packing and calculating the permeability of packing assemblages is given as reference.

    This code was made for the course TPG4560 – Petroleum Engineering, Specialization Project in Norwegian University of Science and Technology(NTNU) as an attenmpt to understand the relationship between grain packing and single phase transport properties.

    In this repository, the codes for generating 2 dimensional grain packing, area weighted normal distribution and permeability calculation based on Poisson equation are presented on the python platform. Specifically, the awcdf.py is the code for area weighted normal distribution to determine grain size distribution. the GrainPacking_2DMain.py is the main code for generating 2D grain packing. the GrainPacking2D_Function.py is the code for used function that is assistance of the GrainPacking_2DMain.py.

    for 2D grian packing permeability, we mainly calculate it by solving Poisson equation using Finite difference Method. The code is given in permeabilityFunction.py. And the mesh.npy is one example of the packing data which will be used to calculate permeability.

    The code will run fastly. The grain packing process will take around half minite and permeability calculation will take about 5 seconds.

    Bear in mind that the code is far from perfect. Some code optimization here and there can be done. Especially, there are probably some bugs I haven’t found. If someone find bugs, do not hesitate to give comment and let me know. It will be appreciated that you are willing to make some improvements. Any suggestion and modification are warmly welcome. you can send it to my email, upcmaoqiangqiang@outlook.com or maoqiangqiangupc@gmail.com. Thank you.

    Sincerely thanks are given to my supervisor Prof. Carl Fredirk Berg in the department of geoscience and petroleum in NTNU. He gave me many guidance on my graduation specialized project and my bachelor thesis. Thanks my supervisor.

    by Mao Qiangqiang 4th, July 2019, exchanged student in Norway University of Science and Technology and bachelor in China University of Petroleum (East China).

    Visit original content creator repository
    https://github.com/maoqiangqiang/Grain-Packing

  • WRAQ

    About WRAQ

    • New@20250711: Revision of BOM.xlsx to update the part information of the header pin attached to the PCB board.
    • New@20240802: Instruction to build WRAQ hardware now available here

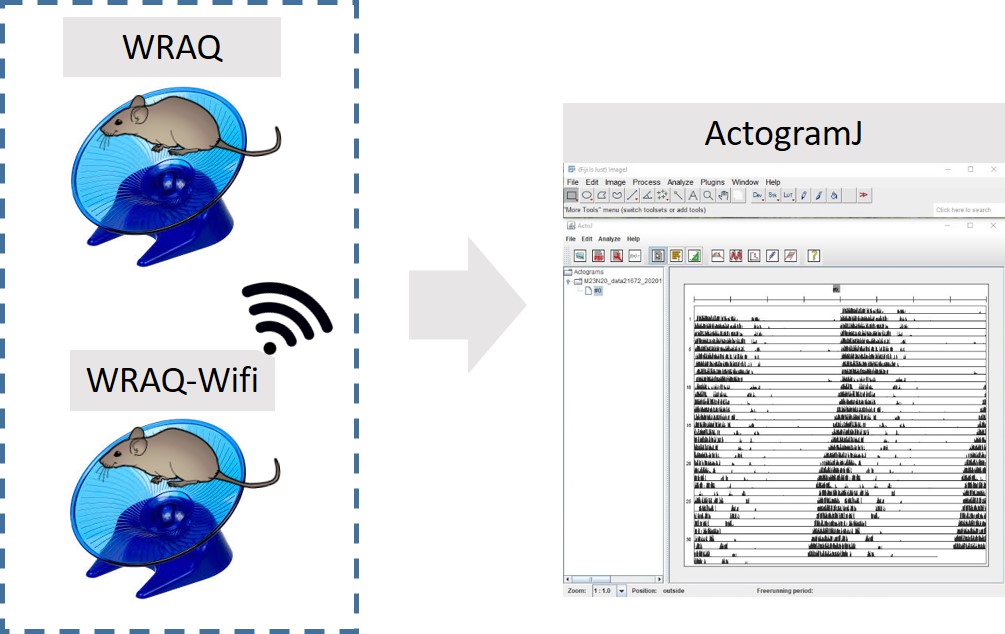
    WRAQ is an acronym that stands for Wheel Running Activity acQuisition, a microcontroller driven open-source stand-alone solution to monitor wheel running activity of mice at the home cage1. This repository includes the detailed guide for installing the integrated developmental environment (IDE) and dependent libraries for building and setting up WRAQ systems – WRAQ and WRAQ-Wifi. WRAQ and WRAQ-WiFi are based on Adafruit Adalogger and DFRobot FireBeetle ESP32 connected to the 4- and 8-bit binary counters receiving the signal from reed switch attached to the 5-inch flying saucer (Ware Manufacturing Inc., Phoenix, AZ), respectively. Please refer to the instruction to build WRAQ hardware available here.

    Mouse activity data is stored as comma-separated values (csv) format. Basic analysis is done using ActogramJ2 which is a software package based on ImageJ for the analysis and visualization of chronobiological data. Python is used to parse WRAQ output data (csv) to ActogramJ compatible input data file. The workflow and the python scripts used for the data analysis of the voluntary activity of mouse is also provided here.

    References

    [1] Zhu M, Kasaragod DK, Kikutani K, Taguchi K, Aizawa H. A novel microcontroller-based system for the wheel-running activity in mice. eNeuro. 2021 Sep 3:ENEURO.0260-21.2021. doi: 10.1523/ENEURO.0260-21.2021. Epub ahead of print. PMID: 34479979.

    [2] Schmid B, Helfrich-Förster C, Yoshii T: A new ImageJ plugin “ActogramJ” for chronobiological analyses. J Biol Rhythms 2011, 26:464-467.

    Visit original content creator repository https://github.com/neurobio-hiroshima/WRAQ
  • django-we

    django-we

    Django WeChat OAuth2/Share/Token API

    Installation

    pip install django-we

    Urls.py

    from django.urls import include, re_path
    
    urlpatterns = [
        re_path(r'^we/', include('django_we.urls', namespace='django_we')),
    ]

    or

    from django.urls import re_path
    from django_we import views as we_views
    
    # WeChat OAuth2
    urlpatterns = [
        re_path(r'^o$', we_views.we_oauth2, name='shorten_o'),
        re_path(r'^oauth$', we_views.we_oauth2, name='shorten_oauth'),
        re_path(r'^oauth2$', we_views.we_oauth2, name='shorten_oauth2'),
        re_path(r'^we_oauth2$', we_views.we_oauth2, name='we_oauth2'),
        re_path(r'^base_redirect$', we_views.base_redirect, name='base_redirect'),
        re_path(r'^userinfo_redirect$', we_views.userinfo_redirect, name='userinfo_redirect'),
        re_path(r'^direct_base_redirect$', we_views.direct_base_redirect, name='direct_base_redirect'),
        re_path(r'^direct_userinfo_redirect$', we_views.direct_userinfo_redirect, name='direct_userinfo_redirect'),
    ]
    
    # WeChat Share
    urlpatterns += [
        re_path(r'^ws$', we_views.we_share, name='shorten_we_share'),
        re_path(r'^weshare$', we_views.we_share, name='we_share'),
    ]
    
    # WeChat JSAPI Signature
    urlpatterns += [
        re_path(r'^js$', we_views.we_jsapi_signature_api, name='shorten_we_jsapi_signature_api'),
        re_path(r'^jsapi_signature$', we_views.we_jsapi_signature_api, name='we_jsapi_signature_api'),
    ]
    
    # WeChat Token
    urlpatterns += [
        re_path(r'^token$', we_views.we_access_token, name='we_token'),
        re_path(r'^access_token$', we_views.we_access_token, name='we_access_token'),
    ]

    Settings.py

    INSTALLED_APPS = (
        ...
        'django_we',
        ...
    )
    
    # Wechat Settings
    WECHAT = {
        'JSAPI': {
            'token': '5201314',
            'appID': '',
            'appsecret': '',
            'mchID': '',
            'apiKey': '',
            'mch_cert': '',
            'mch_key': '',
            'redpack': {
                'SEND_NAME': '',
                'NICK_NAME': '',
                'ACT_NAME': '',
                'WISHING': '',
                'REMARK': '',
            }
        },
    }
    
    # Wechat OAuth Cfg
    DJANGO_WE_OAUTH_CFG = 'JSAPI'  # Default ``JSAPI``
    
    # Based on Urls.py
    # WECHAT_OAUTH2_REDIRECT_URI = 'https://we.com/we/we_oauth2?scope={}&redirect_url={}'
    # WECHAT_OAUTH2_REDIRECT_URI = 'https://we.com/we/o?scope={}&r={}'  # Shorten URL
    WECHAT_OAUTH2_REDIRECT_URI = 'https://we.com/we/o?r={}'  # Shorten URL Farther, Scope default ``snsapi_userinfo``
    WECHAT_BASE_REDIRECT_URI = 'https://we.com/we/base_redirect'
    WECHAT_USERINFO_REDIRECT_URI = 'https://we.com/we/userinfo_redirect'
    WECHAT_DIRECT_BASE_REDIRECT_URI = 'https://we.com/we/direct_base_redirect'
    WECHAT_DIRECT_USERINFO_REDIRECT_URI = 'https://we.com/we/direct_userinfo_redirect'
    
    # Temp Share Page to Redirect
    WECHAT_OAUTH2_REDIRECT_URL = ''

    Callbacks

    Wechat_Only

    • Settings.py

      MIDDLEWARE = [
          ...
          'detect.middleware.UserAgentDetectionMiddleware',
          ...
      ]
      
      WECHAT_ONLY = True  # Default False
    • Usage

      from django_we.decorators import wechat_only
      
      @wechat_only
      def xxx(request):
          """ Docstring """

    Visit original content creator repository
    https://github.com/django-xxx/django-we

  • Python1

    Python1 优惠码和 2024 年最新特价云服务器活动整理

    Python1 介绍

    Python1 是一家提供高质量虚拟专用服务器 (VPS) 的公司,其 SSD 云服务器在行业内深受用户信赖。提供的产品具有卓越的性能、强大的安全性和可靠的服务。Python1 的 VPS 服务支持 VirtFusion 面板,为用户提供丰富且便捷的管理功能。

    image

    Python1 官网地址

    https://www.python1.com

    Python1 优惠码

    Python1 提供了一个 25% 的优惠码,用于年度账单周期: 优惠码:VPSDEAL25

    点击查看 Python1 官网最新优惠活动

    Python1 优惠活动

    VPS 套餐 价格 规格
    Nebula 每月 $3.99 2GB 内存,10GB SSD 存储,2 核 CPU,200GB 流量,99.99% 稳定性,瞬间设置
    Comet 每月 $7.99 2GB 内存,20GB SSD 存储,2 核 CPU,400GB 流量,99.99% 稳定性,瞬间设置
    Stellar 每月 $14.50 2GB 内存,40GB SSD 存储,4 核 CPU,600GB 流量,99.99% 稳定性,瞬间设置
    Apollo 每月 $21.50 4GB 内存,40GB SSD 存储,4 核 CPU,800GB 流量,99.99% 稳定性
    Cosmos 每月 $27.50 4GB 内存,60GB SSD 存储,4 核 CPU,1TB 流量,99.99% 稳定性
    Orion 每月 $34.50 4GB 内存,60GB SSD 存储,6 核 CPU,1.2TB 流量,99.99% 稳定性

    Python1 评测

    Python1 提供稳定且优质的服务,用户满意度很高,主要评价如下:

    • TrustPilot.com:
      • JM, 2021 年 11 月 4 日:
        “非常好!工作人员非常乐于助人,效率高。感谢 Python1!”
    • HostReview.com:
      • Tim W, 2014 年 7 月 16 日:
        “Python1 的服务快速、可靠且实惠。强烈推荐!支持团队也很棒。”
    • 其他用户评价:
      • “质量高,价格合理。”
      • “支持团队响应迅速,解决问题得当。”

    Python1 常见问题

    • 服务多久设置完成?
      支付后立刻设置完成。

    • 可以升级或降级服务吗?
      可以随时升级或降级。

    • 是否有退款保证?
      提供 30 天无条件退款保证,全额退还。

    • 支付方式有哪些?
      接受 2Checkout、PayPal 和其他数字钱包支付方式。

    Visit original content creator repository https://github.com/teapoywfm/Python1
  • jsonplus

    JSONPlus

    a JSON parser that supports comments and self references

    Build Status npm License TypeScript definitions on DefinitelyTyped

    Usage

    Install using npm

    npm install --save-dev jsonplus
    

    It’s really simple

    var jsonplus = require('jsonplus');
    
    // Parse like you would with JSON.parse
    var response = jsonplus.parse('{"foo": 5, "bar": "@self.foo"}');
    
    console.log(response); // { foo: 5, bar: 5 }

    jsonplus uses JSON.parse internally so there shouldn’t be any performance impact. We only go through JSON object once to find the reference strings and replace them with actual values. The impact is minimal considering the gained value.

    Self referencing

    Self referencing only works on values at the moment. Values start with @self will be parsed as a reference. Think of @self as this; the rest of it is usual object navigation such as @self.foo.bar.list[1]. If a self reference cannot be found, it will be replaced with undefined

    Template tags

    You can also use template tags in the values, this is the same thing as self referencing but you can use multiple references in the same value. One of the advantages of having template tags is you can simply omit the @self prefix all together — or keep using it it’s up to you 🙂

    Example:

    {
      "first": "john",
      "last": "doe",
      "full": "{{ first }} {{ last }}"
    }

    If your JSON is a first level array you can use paths like this {{ [0].first }} or if you think it’s more readable, {{ @self[0].first }} works as well.

    Note: Due to the nature of template tags, everything that passes through them will be converted to string, whereas @self notation can replace itself with whatever it is referencing.

    External File References

    You can also make references to external files. JSONPlus will fetch those files and allow you to share values between json files.

    {
      // @ext means external
      "@ext": {
        // Value of `users` will be replaced with the contents of users.json
        "users": "/path/to/users.json"
      },
      // Reach the values of external file using @ext prefix
      "name": "@ext.users[1].name"
    }

    Notes on external files:

    • External references can only work on direct objects. json strings that starts with an array ie,[{ "my": "json" }] cannot reference to external files.
    • File paths are relative to where your script is running, not to the JSON file.
    • If you reference a file that references to your file back, you’ll end up in infinite loop.

    Resolve function

    Additionally, you can use the reference resolver directly. You might be parsing your JSON files with your own system i.e. streaming and you might only want to have the reference resolver. Here is an example

    var resolve = require('jsonplus').resolve
    
    // This will resolve all reference strings on the given object
    var object = resolve(AlreadyParsedJSON);
    
    // resolve has a second argument, which provides the context for references
    var object = resolve({ full: '{{ first }} {{ last }}' }, { first: 'john', last: 'doe' });
    
    console.log(object) // { full: 'john doe' }

    A complex example

    {
      // Get all users
      "/api/users": {
        // Mock response
        "response": {
          "users": [{
            "name": "john doe"
          }, {
            "name": "jane doe"
          }]
        }
      },
    
      // Get individual user
      "/api/user/1": {
        // Get already defined user from users mock
        "response": "@self['/api/users'].response.users[0]"
      },
    
      // Get individual user
      "/api/user/2": {
        // Get already defined user from users mock
        "response": "@self['/api/users'].response.users[1]"
      }
    }

    It’s quite self explanatory. As you can see it makes things a lot more clearer and shorter.

    Why?

    Self referencing and comments in JSON files can be really useful while creating fixture files. I don’t expect anyone to use this for production purposes. JSONPlus should help you create simpler fixtures with comments and can be also used for configuration files.

    MIT License

    Copyright (c) 2015 Serkan Yersen
    
    Permission is hereby granted, free of charge, to any person obtaining a
    copy of this software and associated documentation files (the "Software"),
    to deal in the Software without restriction, including without limitation
    the rights to use, copy, modify, merge, publish, distribute, sublicense,
    and/or sell copies of the Software, and to permit persons to whom the
    Software is furnished to do so, subject to the following conditions:
    
    The above copyright notice and this permission notice shall be included in
    all copies or substantial portions of the Software.
    
    THE SOFTWARE IS PROVIDED "AS IS", WITHOUT WARRANTY OF ANY KIND, EXPRESS OR
    IMPLIED, INCLUDING BUT NOT LIMITED TO THE WARRANTIES OF MERCHANTABILITY,
    FITNESS FOR A PARTICULAR PURPOSE AND NONINFRINGEMENT. IN NO EVENT SHALL THE
    AUTHORS OR COPYRIGHT HOLDERS BE LIABLE FOR ANY CLAIM, DAMAGES OR OTHER
    LIABILITY, WHETHER IN AN ACTION OF CONTRACT, TORT OR OTHERWISE, ARISING
    FROM, OUT OF OR IN CONNECTION WITH THE SOFTWARE OR THE USE OR OTHER
    DEALINGS IN THE SOFTWARE.
    
    Visit original content creator repository https://github.com/serkanyersen/jsonplus