Category: Blog

  • nvm-windows

    Notice: We are working full time work on Runtime, the successor to NVM for Windows.

    Complete this form to provide your thoughts and sign up for progress updates.
    Updates will also be posted on the Author Software LinkedIn Page.

    NVM for Windows

    The Microsoft/npm/Google recommended Node.js version manager for Windows.
    This is not the same thing as nvm! (expand for details)

    The original nvm is a completely separate project for Mac/Linux only. This project uses an entirely different philosophy and is not just a clone of nvm. Details are listed in Why another version manager? and what’s the big difference?.

    Download Now GitHub tag (latest SemVer) GitHub Release Date GitHub all releases Discuss Twitter URL

    Sponsors
     

    Can’t sponsor?
    Consider nominating @coreybutler for a Github star.

    Running into issues? See the common issues wiki.

    Seeking Feedback:

    We’re working on Runtime (rt), the successor to NVM For Windows. Please contribute by taking a minute to complete this form. Thank you!

    Overview

    Manage multiple installations of node.js on a Windows computer.

    tl;dr Similar (not identical) to nvm, but for Windows. Has an installer. Download Now!

    This has always been a node version manager, not an io.js manager, so there is no back-support for io.js. Node 4+ is supported. Remember when running nvm install or nvm use, Windows usually requires administrative rights (to create symlinks). To install the latest version of Node.js, run nvm install latest. To install the latest stable version, run nvm install lts.

    NVM for Windows

    There are situations where the ability to switch between different versions of Node.js can be very useful. For example, if you want to test a module you’re developing with the latest bleeding edge version without uninstalling the stable version of node, this utility can help.

    Switch between stable and unstable versions.

    Installation & Upgrades

    ⭐ ⭐ Uninstall any pre-existing Node installations!! ⭐ ⭐

    The simplest (recommended) way to get NVM for Windows running properly is to uninstall any prior Node installation before installing NVM for Windows. It avoids all of the pitfalls listed below. However; you may not wish to nuke your Node installation if you’ve highly customized it. NVM for Windows can assume management of an existing installation, but there are nuances to this (dependent entirely on the permissions of the user running the installation). If you have an administrative account, it’s relatively safe to install NVM for Windows before uninstalling the original Node version. If you are working in a closed environment, such as a corporate Active Directory environment where installations/uninstallations are controlled by group policy, you should really consider removing the original version of Node before installing NVM4W.

    Permission Problems For security reasons, Windows will not allow an application from one vendor to “uninstall” an application from a different vendor. The official NVM4W installer will attempt assume management of an existing installation of Node., but it cannot actually uninstall the original Node.js version. To work around this, NVM for Windows installer attempts to copy the original Node.js installation files to the NVM root. This includes global npm modules and configurations. Once this process is complete, the original Node.js installation can be uninstalled without losing data.

    PATH Installation Problems If you attempt to configure the NVM_SYMLINK to use an existing directory (like C:\Program Files\nodejs), it will fail because a symlink cannot overwrite a physical directory. This is not a problem if you choose a different symlink path (such as C:\nvm\node).

    PATH Conflicts If you do not uninstall the original version, running nvm use may appear to do nothing at all. Running node -v will always show the original installation version. This is due to a PATH conflict that presents when the same application is installed multiple times. In NVM4W 1.1.11+, run nvm debug to determine if you have a PATH conflict.

    For simpliciy, we recommend uninstalling any existing versions of Node.js before using NVM for Windows. Delete any existing Node.js installation directories (e.g., %ProgramFiles%\nodejs) that might remain. NVM’s generated symlink will not overwrite an existing (even empty) installation directory.

    👀 Backup any global npmrc config 👀 (e.g. %AppData%\npm\etc\npmrc)

    Alternatively, copy the settings to the user config %UserProfile%\.npmrc. Delete the existing npm install location (e.g. %AppData%\npm) to prevent global module conflicts.

    Install nvm-windows

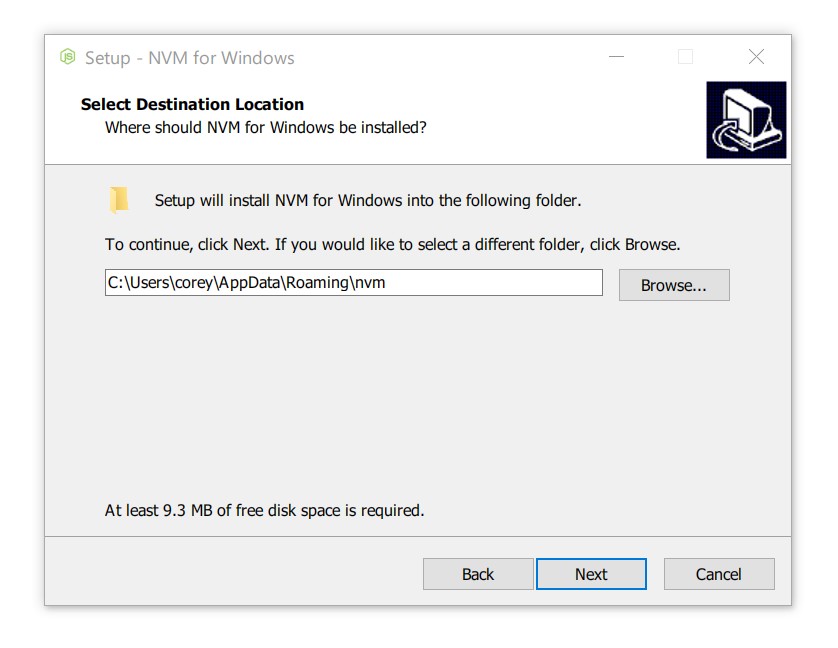
    Use the latest installer (comes with an uninstaller). Alternatively, follow the manual installation guide.

    If NVM4W doesn’t appear to work immediately after installation, restart the terminal/powershell (not the whole computer).

    NVM for Windows Installer

    Reinstall any global utilities

    After install, reinstalling global utilities (e.g. yarn) will have to be done for each installed version of node:

    nvm use 14.0.0
    npm install -g yarn
    nvm use 12.0.1
    npm install -g yarn
    

    Upgrading nvm-windows

    💡 As of v1.1.8, there is an upgrade utility that will automate the upgrade process.

    To upgrade nvm-windows, run the new installer. It will safely overwrite the files it needs to update without touching your node.js installations. Make sure you use the same installation and symlink folder. If you originally installed to the default locations, you just need to click “next” on each window until it finishes.

    Usage

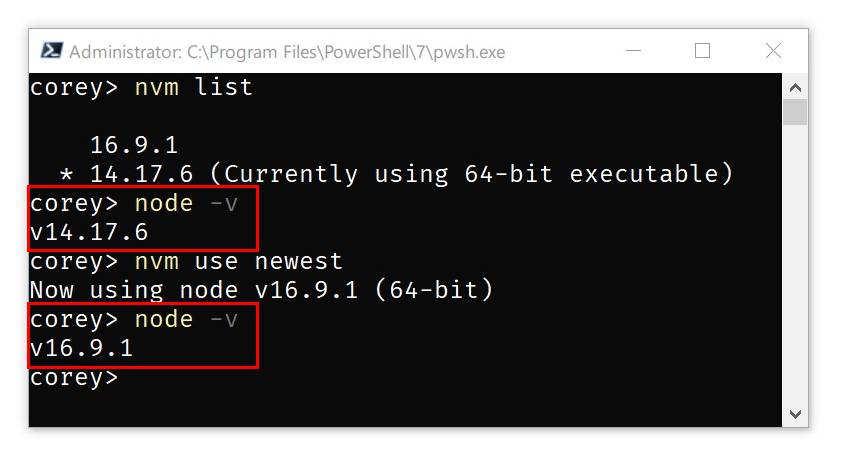
    nvm-windows runs in an Admin shell. You’ll need to start powershell or Command Prompt as Administrator to use nvm-windows

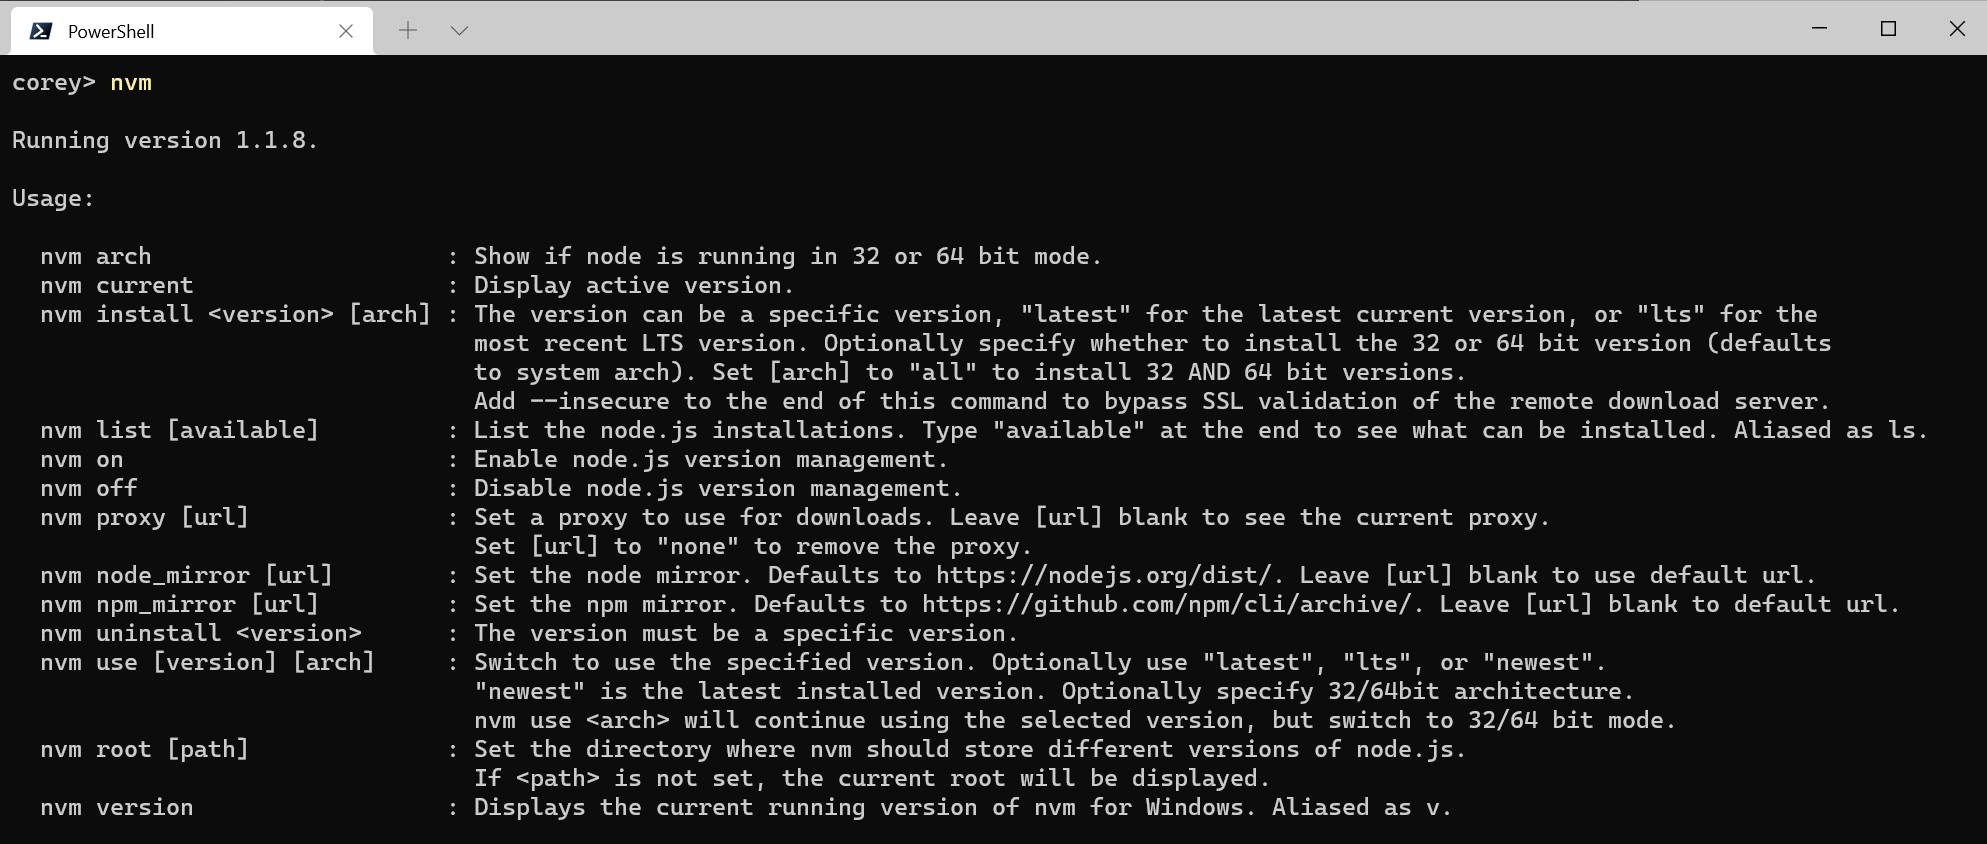
    NVM for Windows is a command line tool. Simply type nvm in the console for help. The basic commands are:

    • nvm arch [32|64]: Show if node is running in 32 or 64 bit mode. Specify 32 or 64 to override the default architecture.
    • nvm debug: Check the NVM4W process for known problems.
    • nvm current: Display active version.
    • nvm install <version> [arch]: The version can be a specific version, “latest” for the latest current version, or “lts” for the most recent LTS version. Optionally specify whether to install the 32 or 64 bit version (defaults to system arch). Set [arch] to “all” to install 32 AND 64 bit versions. Add --insecure to the end of this command to bypass SSL validation of the remote download server.
    • nvm list [available]: List the node.js installations. Type available at the end to show a list of versions available for download.
    • nvm on: Enable node.js version management.
    • nvm off: Disable node.js version management (does not uninstall anything).
    • nvm proxy [url]: Set a proxy to use for downloads. Leave [url] blank to see the current proxy. Set [url] to “none” to remove the proxy.
    • nvm uninstall <version>: Uninstall a specific version.
    • nvm use <version> [arch]: Switch to use the specified version. Optionally use latest, lts, or newest. newest is the latest installed version. Optionally specify 32/64bit architecture. nvm use <arch> will continue using the selected version, but switch to 32/64 bit mode. For information about using use in a specific directory (or using .nvmrc), please refer to issue #16.
    • nvm root <path>: Set the directory where nvm should store different versions of node.js. If <path> is not set, the current root will be displayed.
    • nvm version: Displays the current running version of NVM for Windows.
    • nvm node_mirror <node_mirror_url>: Set the node mirror.People in China can use https://npmmirror.com/mirrors/node/
    • nvm npm_mirror <npm_mirror_url>: Set the npm mirror.People in China can use https://npmmirror.com/mirrors/npm/

    ⚠️ Gotcha!

    Please note that any global npm modules you may have installed are not shared between the various versions of node.js you have installed. Additionally, some npm modules may not be supported in the version of node you’re using, so be aware of your environment as you work.

    📛 Antivirus

    Users have reported some problems using antivirus, specifically McAfee. It appears the antivirus software is manipulating access to the VBScript engine. See issue #133 for details and resolution.

    v1.1.8 is not code signed, but all other versions are signed by Ecor Ventures LLC/Author.io. This should help prevent false positives with most antivirus software.

    v1.1.8+ was not code signed due to an expired certificate (see the release notes for reasons). v1.1.9 is code signed thanks to ajyong, who sponsored the new certificate.

    Using Yarn

    tldr; npm i -g yarn

    See the wiki for details.

    Build from source

    • Install go from http://golang.org
    • Download source / Git Clone the repo
    • Change GOARCH to amd64 in build.bat if you feel like building a 64-bit executable
    • Fire up a Windows command prompt and change directory to project dir
    • Execute go get github.com/blang/semver
    • Execute go get github.com/olekukonko/tablewriter
    • Execute build.bat
    • Check the distdirectory for generated setup program.

    💡 Why another version manager?

    There are several version managers for node.js. Tools like nvm and n only run on Mac OSX and Linux. Windows users are left in the cold? No. nvmw and nodist are both designed for Windows. So, why another version manager for Windows?

    The architecture of most node version managers for Windows rely on .bat files, which do some clever tricks to set or mimic environment variables. Some of them use node itself (once it’s downloaded), which is admirable, but prone to problems. Right around node 0.10.30, the installation structure changed a little, causing some of these to just stop working with anything new.

    Additionally, some users struggle to install these modules since it requires a little more knowledge of node’s installation structure. I believe if it were easier for people to switch between versions, people might take the time to test their code on back and future versions… which is just good practice.

    💡 What’s the big difference?

    First and foremost, this version of nvm has no dependency on node. It’s written in Go, which is a much more structured approach than hacking around a limited .bat file. It does not rely on having an existing node installation. Go offers the ability to create a Mac/Linux version on the same code base. In fact, this is already underway.

    The control mechanism is also quite different. There are two general ways to support multiple node installations with hot switching capabilities. The first is to modify the system PATH any time you switch versions, or bypass it by using a .bat file to mimic the node executable and redirect accordingly. This always seemed a little hackish to me, and there are some quirks as a result of this implementation.

    The second option is to use a symlink. This concept requires putting the symlink in the system PATH, then updating its target to the node installation directory you want to use. This is a straightforward approach, and seems to be what people recommend…. until they realize just how much of a pain symlinks are on Windows. This is why it hasn’t happened before.

    In order to create/modify a symlink, you must be running as an admin, and you must get around Windows UAC (that annoying prompt). Luckily, this is a challenge I already solved with some helper scripts in node-windows. As a result, NVM for Windows maintains a single symlink that is put in the system PATH during installation only. Switching to different versions of node is a matter of switching the symlink target. As a result, this utility does not require you to run nvm use x.x.x every time you open a console window. When you do run nvm use x.x.x, the active version of node is automatically updated across all open console windows. It also persists between system reboots, so you only need to use nvm when you want to make a change.

    NVM for Windows comes with an installer, courtesy of a byproduct of my work on Fenix Web Server.

    Overall, this project brings together some ideas, a few battle-hardened pieces of other modules, and support for newer versions of node.

    NVM for Windows recognizes the “latest” versions using a list provided by the Node project. Version 1.1.1+ use this list. Before this list existed, I was scraping releases and serving it as a standalone data feed. This list was used in versions 1.1.0 and prior, but is now deprecated.

    Motivation

    I needed it, plain and simple. Additionally, it’s apparent that support for multiple versions is not coming to node core. It was also an excuse to play with Go.

    Why Go? Why not Node?

    I chose Go because it is cross-platform, felt like less overhead than Java, has been around longer than most people think. Plus, I wanted to experiment with it. I’ve been asked why I didn’t write it with Node. Trying to write a tool with the tool you’re trying to install doesn’t make sense to me. As a result, my project requirements for this were simple… something that’s not Node. Node will continue to evolve and change. If you need a reminder of that, remember io.js, Ayo, all the breaking changes between 4.x.x and 6.x.x, and the shift to ES Modules in 12+. Change is inevitable in the world of software. JavaScript is extremely dynamic.

    🙏 Thanks

    Thanks to everyone who has submitted issues on and off Github, made suggestions, and generally helped make this a better project. Special thanks to

    • @vkbansal, who provided significant early feedback throughout the early releases.
    • @rainabba and @sullivanpt for getting Node v4 support integrated.
    • @s-h-a-d-o-w who resolved the longstanding space escaping issue in path names (#355).
    • ajyong who sponsored the code signing certificate in late 2021.

    Contributors

    Visit original content creator repository https://github.com/coreybutler/nvm-windows
  • forest-service-prototype

    Visit original content creator repository
    https://github.com/barrylustig/forest-service-prototype

  • cloudwatch-logback-appender

    Logback log appender for AWS CloudWatch

    Background

    This package provides a logback appender that writes its log events to Cloudwatch. Before you say it, there seem to be many projects like this out there but I could find none of them that were self-contained and that were published to the central Maven repo.

    • Code available from the git repository. CircleCI CodeCov
    • Maven packages are published via Maven Central javadoc

    Enjoy. Gray Watson

    Maven Configuration

    dependencies> <dependency> <groupId>com.j256.cloudwatchlogbackappender</groupId> <artifactId>cloudwatchlogbackappender</artifactId> <!-- NOTE: change the version to the most recent release version from the repo --> <version>2.0</version> </dependency> </dependencies>

    Dependencies

    By default the appender has dependencies on logback (duh) but also the log (cloudwatch) and ec2 AWS SDK packages. You can add a exclusion for these packages if you want to depend on different versions.

    <dependency>
    	<groupId>com.amazonaws</groupId>
    	<artifactId>aws-java-sdk-logs</artifactId>
    	<version>1.11.914</version>
    </dependency>
    <dependency>
    	<groupId>com.amazonaws</groupId>
    	<artifactId>aws-java-sdk-ec2</artifactId>
    	<version>1.11.914</version>
    </dependency>

    logback.xml Configuration

    Minimal logback appender configuration:

    <appender name="CLOUDWATCH" class="com.j256.cloudwatchlogbackappender.CloudWatchAppender">
    	...
    	<layout class="com.j256.cloudwatchlogbackappender.Ec2PatternLayout">
    		<pattern>\[%instance\] \[%thread\] %level %logger{20} - %msg%n%xThrowable</pattern>
    	</layout>

    Here is the complete list of the appender properties.

    Property Type Default Description
    region string none AWS region needed by CloudWatch API
    logGroup string none Log group name
    logStream string none Log stream name
    accessKeyId string none AWS API access key ID, see AWS Permissions below.
    Code will use DefaultAWSCredentialsProviderChain by default.
    secretKey string none AWS API secret key, see AWS Permissions below.
    Code will use DefaultAWSCredentialsProviderChain by default.
    maxBatchSize int 128 Maximum number of log events put into CloudWatch in single request.
    maxBatchTimeMillis long 5000 Maximum time in milliseconds to collect log events to submit batch.
    maxQueueWaitTimeMillis long 100 Maximum time in milliseconds to wait if internal queue is full before using the emergency appender (see below).
    initialWaitTimeMillis long 0 Initial wait time before logging messages. Helps if server needs to configure itself initially.
    internalQueueSize int 8192 Size of the internal log event queue.
    createLogDests boolean true Create the CloudWatch log and stream if they don’t exist.
    maxEventMessageSize int 256k Maximum size of event message before it is truncated or sent to emergency appender.
    truncateEventMessages boolean true If an event it too large, should the message be truncated. If false then it will be sent to emergency appender.
    copyEvents boolean true Copies the event for logging by the background thread.
    printRejectedEvents boolean false Print any rejected events to stderr if the emergency appender doesn’t work.

    Emergency Appender

    Since this appender is queuing up log events and then writing them remotely, there are a number of situations which might result in log events not getting remoted correctly. To protect against this, you can add in an “emergency” appender to write events to the console or a file by adding the following to your CLOUDWATCH appender stanza:

    <appender name="CLOUDWATCH" class="com.j256.cloudwatchlogbackappender.CloudWatchAppender">
    	...
    	<appender-ref ref="EMERGENCY_FILE" />

    This appender will be used if:

    • there was some problem configuring the CloudWatch or other AWS APIs
    • the internal queue fills up and messages can’t be written remotely fast enough
    • there was some problem with the actual put events CloudWatch call – maybe a transient network failure

    If no emergency appender is configured and a problem does happen then the log messages will be not be persisted.

    AWS Permissions

    You can specify the AWS CloudWatch permissions in a number of ways. If you use the accessKeyId and secretKey settings in the logback.xml file then the appender will use those credentials directly. You can also set the cloudwatchappender.aws.accessKeyId and cloudwatchappender.aws.secretKey Java System properties which will be used. If neither of those are specified then the appender will use the DefaultAWSCredentialsProviderChain which looks for the access and secret keys in:

    • Environment Variables: AWS_ACCESS_KEY_ID and AWS_SECRET_ACCESS_KEY or AWS_ACCESS_KEY and AWS_SECRET_KEY
    • Java System Properties: aws.accessKeyId and aws.secretKey
    • Credential file at the default location (~/.aws/credentials) shared by all AWS SDKs and the AWS CLI
    • Instance profile credentials delivered through the Amazon EC2 metadata service

    IAM Permissions

    When making any AWS API calls, we typically create a IAM user with specific permissions so if any API keys are stolen, the hacker only have limited access to our AWS services. To get the appender to be able to publish to CloudWatch, the following IAM policy is required to create the log group and put log events to CloudWatch.

    The logs:CreateLogGroup and logs:CreateLogStream actions are only required if the appender is creating the log-group and stream itself (see createLogDests option above). The ec2:DescribeTags action is only required if you want the appender to query for the ec2 instance name it is on – see Ec2PatternLayout above.

    {
        "Version": "2012-10-17",
        "Statement": [
            {
                "Effect": "Allow",
                "Action": [
                    "logs:CreateLogGroup",
                    "logs:CreateLogStream",
                    "logs:DescribeLogGroups",
                    "logs:DescribeLogStreams",
                    "logs:PutLogEvents",
                    "ec2:DescribeTags"
                ],
                "Resource": [
                    "*"
                ]
            }
        ]
    }

    I couldn’t figure out how to restrict to all ec2 instances. If you are only doing log requests then you should be able to limit it to the resource arn:aws:logs:*:*:*.

    ChangeLog Release Notes

    See the ChangeLog.txt file.

    Visit original content creator repository https://github.com/j256/cloudwatch-logback-appender
  • ebitenlg

    ebitenlg

    demo

    A lightweight floating GUI panel library ported to Ebitengine. Inspired by the web-based lil-gui, this Go implementation allows seamless integration with Ebitengine.

    Features

    • Lightweight and easy-to-use floating GUI panels
    • Seamless integration with Ebitengine

    Usage

    First, create a new GUI panel using ebitenlg.NewGUI(), then add controls to it. In your main loop, call the Update() and Draw() methods to render the GUI.

    package main
    
    import (
    	"image/color"
    	_ "image/png"
    
    	"github.com/demouth/ebitenlg"
    	"github.com/hajimehoshi/ebiten/v2"
    )
    
    const (
    	screenWidth  = 600
    	screenHeight = 600
    )
    
    type Game struct {
    	gui *ebitenlg.GUI
    }
    
    func (g *Game) Update() error {
    	g.gui.Update()
    	return nil
    }
    
    func (g *Game) Draw(screen *ebiten.Image) {
    	screen.Fill(color.NRGBA{0x66, 0x66, 0x66, 0xff})
    	g.gui.Draw(screen)
    }
    
    func (g *Game) Layout(outsideWidth, outsideHeight int) (int, int) {
    	return screenWidth, screenHeight
    }
    
    func main() {
    	game := &Game{}
    
    	gui := ebitenlg.NewGUI()
    	gui.X = screenWidth
    	gui.HorizontalAlign = ebitenlg.HorizontalAlignRight
    
    	var default64, min64, max64 float64 = 0.05, -0.1, 0.1
    	gui.AddSliderFloat64("float64", default64, min64, max64, func(v float64) {
    		// v is the value of the slider
    	})
    
    	var default32, min32, max32 float32 = 10.0, -5.0, 20.0
    	gui.AddSliderFloat32("float32", default32, min32, max32, func(v float32) {
    		// v is the value of the slider
    	})
    
    	var defaultInt, minInt, maxInt int = 0, -500, 500
    	gui.AddSliderInt("int", defaultInt, minInt, maxInt, func(v int) {
    		// v is the value of the slider
    	})
    
    	var defaultBool bool = true
    	gui.AddButton("button", defaultBool, func(v bool) {
    		// v is the value of the button
    	})
    	game.gui = gui
    
    	ebiten.SetWindowSize(screenWidth, screenHeight)
    	ebiten.SetWindowTitle("Ebitengine lil GUI")
    	ebiten.RunGame(game)
    }

    Adding Controllers

    slider

    To add a float64 slider, use the following code:

    var default64, min64, max64 float64 = 0.05, -0.1, 0.1
    gui.AddSliderFloat64("float64", default64, min64, max64, func(v float64) {
        // v is the value of the slider
    })

    float64

    For a float32 slider, use the following code:

    var default32, min32, max32 float32 = 10.0, -5.0, 20.0
    gui.AddSliderFloat32("float32", default32, min32, max32, func(v float32) {
        // v is the value of the slider
    })

    float32

    To add an int slider, use the following code:

    var defaultInt, minInt, maxInt int = 0, -500, 500
    gui.AddSliderInt("int", defaultInt, minInt, maxInt, func(v int) {
        // v is the value of the slider
    })

    int

    button

    To add a button, set a bool value as follows:

    var defaultBool bool = true
    gui.AddButton("button", defaultBool, func(v bool) {
        // v is the value of the button
    })

    bool

    Visit original content creator repository https://github.com/demouth/ebitenlg
  • PANACEA

    PANACEA: Personalized Network-based Anti-Cancer Therapy Evaluation

    R-CMD-check Codecov test coverage CRAN version License:MIT

    Identification of the most appropriate pharmacotherapy for each patient based on genomic alterations is a major challenge in personalized oncology. PANACEA is a collection of personalized anti-cancer drug prioritization approaches utilizing network methods. The methods utilize personalized “driverness” scores from driveR to rank drugs, mapping these onto a protein-protein interaction network. The “distance-based” method scores each drug based on these scores and distances between drugs and genes to rank given drugs. The “RWR” method propagates these scores via a random-walk with restart framework to rank the drugs.

    The method is described in detail in Ulgen E, Ozisik O, Sezerman OU. PANACEA: network-based methods for pharmacotherapy prioritization in personalized oncology. Bioinformatics. 2023 Jan 1;39(1):btad022. https://doi.org/10.1093/bioinformatics/btad022

    PANACEA workflow

    PANACEA workflow

    Installation

    You can install the latest release version of PANACEA from CRAN via:

    install.packages("PANACEA")

    You can install the development version of PANACEA from GitHub with:

    # install.packages("devtools") @ if you don't have devtools installed
    devtools::install_github("egeulgen/PANACEA", build_vignettes = TRUE)

    Usage

    The wrapper function score_drugs() can be used to score and rank drugs for an individual tumor sample via the “distance-based” or “RWR” method. The required inputs are:

    • driveR_res: data frame of driveR results. Details on how to obtain driveR output are provided in this vignette
    • drug_interactions_df: data frame of drug-gene interactions (defaults to interactions from DGIdb expert-curated sources)
    • W_mat: (symmetric) adjacency matrix for the protein interaction network (defaults to STRING v11.5 interactions with combined score > .4)
    • method: scoring method (one of “distance-based” or “RWR”)

    Example Usage

    For detailed information on how to use PANACEA, please see the vignette “How to use PANACEA” via vignette("how_to_use") or visit this link

    Visit original content creator repository https://github.com/egeulgen/PANACEA
  • sqlitify

    SQLITify

    This project is collections of standalone scripts and patches for converting different pieces of data into SQLite database format.
    Right now it concentrated on dictionaries that exists in form of ad hoc text files or are purely web-based (this limits ability to query them alot).

    urban-dictionary.py

    Being run from command line, creates file urban-dict.db in current directory. Process is safe to interrupt with pressing Ctrl-C or programmaticaly
    (this is necessary because it takes very long time to complete) and will continue from point it was stopped previously.

    hagen-full.py

    Command line utility, usage python hagen-full.py “path/to/Полная парадигма. Морфология.txt” path/to/sqlite.db
    First argument is Russian morphology text file, it could be extracted from here (RAR archive).
    Second argument is resulting DB, it will coontain table parsed_morpho with structure

    Column Possible values
    new_group True if first row of grouped words
    main_word True if this word is default form (like infinitive for verbs, etc.)
    optional True if this form is optional
    word Word itself
    part_of_speech ‘сущ’:1,’прл’:2,’гл’:3,’мест’:4,’союз’:5,’предик’:6,’част’:7,’межд’:8,’предл’:9, ‘числ’:10, ‘прч’:11, ‘дееп’:12, ‘нар’:13,’ввод’:14
    gender ‘муж’:1, ‘жен’:2, ‘ср’:3,’общ’:4
    number ‘ед’:1,’мн’:2
    plural ‘им’:1,’род’:2,’дат’:3,’вин’:4,’тв’:5,’пр’:6,’зват’:7,’счет’:8,’мест’:8,’парт’:10
    tense ‘буд’:3,’наст’:2, ‘прош’:1
    declension ‘1-е’:1,’2-е’:2,’3-е’:3
    transitive ‘перех’:1,’пер/не’:2,’непер’:3
    spirit ‘одуш’:1,’неод’:2
    adverb_type ‘вопр’:1,’обст’:2,’опред’:3,’сравн’:4
    circumstance_type ‘врем’:1,’места’:2,’напр’:3,’причин’:4,’цель’:5
    definition_type ‘степ’:1,’кач’:2, ‘спос’:3
    perfect_type ‘сов’:1,’несов’:2,’2вид’:3
    number_type ‘кол’:1,’поряд’:2,’собир’:3,’неопр’:4
    pronoun_type ‘прил’:1,’сущ’:2,’нар’:3
    infinitive 1 if true
    pledge 1 if ‘страд’
    impersonal 1 if ‘безл’
    shortened 1 if ‘крат’
    immutable 1 if ‘неизм’
    reflexive 1 if ‘воз’
    superlative 1 if ‘прев’
    imperative 1 if ‘пов’


    Visit original content creator repository
    https://github.com/amq5/sqlitify

  • github-unfollow-script

    🐍 GitHub Unfollow Script

    Python GitHub License

    📜 Description

    The GitHub Unfollow Script is a magical Python tool designed to help you manage your GitHub following list effectively. This script automatically unfollows users who are not following you back, ensuring your network remains relevant and streamlined.

    Perfect for maintaining a streamlined and relevant network on GitHub! This script is for developers and GitHub users who want to keep their following list clean and relevant, automating the tedious task of unfollowing inactive or non-reciprocal followers.

    How It Works

    • GitHub API Integration: The script interacts with GitHub using the official GitHub API.
    • Authentication via Personal Access Token: Securely authenticate using a personal access token, which you provide in a .env file.
    • Automated Unfollowing: The script fetches your list of followers and the users you are following, identifies those who do not follow you back, and automatically unfollows them.
    • Comprehensive Reporting: Generates a detailed report of the operation, including the current followers, current following, and a list of users who were unfollowed. The report is saved in the logs directory with a timestamp, and the result is also printed in the console.

    🚀 Features

    • Automatic Unfollowing: Unfollows users who don’t follow you back.
    • Detailed Reporting: Generates a comprehensive report with current followers, following, and the list of unfollowed users.
    • Easy Setup: Simple configuration with a .env file.
    • Cross-Platform: Works on Unix-like systems and Windows.

    📦 Installation

    1. Clone the repository:

      git clone https://github.com/your-username/github-unfollow.git
      cd github-unfollow
    2. Set up a virtual environment:

      • On Unix-like systems:
        source setup_venv.sh 
      • On Windows:
        .\setup_venv.ps1
    3. Create a .env file in the root directory of the project with your GitHub credentials. You can use the provided .env.example template and rename it to .env:

      cp .env.example .env
      

      Then edit the .env file:

      GITHUB_USERNAME=your_username
      GITHUB_TOKEN=your_personal_access_token
      

      personal token you can get here: GitHub > Settings > Developer settings > Personal access tokens
      https://github.com/settings/tokens


    🔑 Creating a GitHub Personal Access Token

    To create a GitHub personal access token:

    1. Go to GitHub Settings.
    2. Click on Developer settings in the left sidebar.
    3. Under Personal access tokens, click on Tokens (classic).
    4. Click Generate new token.
    5. Give your token a descriptive name.
    6. In the Permissions section, set the following permissions:
      • Followers: Access: Read and write
    7. Click Generate token.
    8. Copy the token and add it to your .env file as GITHUB_TOKEN.

    ▶️ How to run

    Run the script:

    python github_unfollow.py

    After running the script, a report will be saved in the logs directory with the current date and time in the filename.

    Example Report

    Example content of a report file:

    2024-06-30 14:45
    Current followers: 51
    Current following: 54

    Unfollowed 3 users:
    nickname1
    nickname2
    nickname3

    This script helps you keep your following list up to date by unfollowing users who are not following you back.

    📄 License

    This project is licensed under the MIT License. See the LICENSE file for details.


    SEO Keywords: GitHub automation, manage GitHub followers, unfollow script, Python GitHub API, automate GitHub, GitHub following management, GitHub unfollow tool, GitHub user management, streamline GitHub network, GitHub follower report

    Contact: For any questions or suggestions, feel free to open an issue or contact me at e-nicko@ya.ru.

    Visit original content creator repository https://github.com/e-Nicko/github-unfollow-script
  • traits

    Traits for C++

    windows linux macos lint codecov

    License

    Define shared behavior in a non-intrusive way while preserving value semantics.

    This library is inspired by Rust Traits and previous projects like Dyno.

    Caution

    At this point, this library is experimental and it is a pure curiosity. No stability of interface or quality of implementation is guaranteed. Some design decisions are likely to change and have a big effect on the way the library is used. Use at your own risks.

    Quick Start

    traits is a single header C++20 library. To use the library, make sure you meet the minimum requirements and just include the header file traits.h in your source code. Alternatively, you can first try it out in Compiler Explorer.

    CMake projects might build, install and find_package(traits) or use fetch content:

    include(FetchContent)
    FetchContent_Declare(traits URL https://github.com/VolumeGraphics/traits/releases/latest/download/traits.zip)
    FetchContent_MakeAvailable(traits)

    There are currently no plans to support vcpkg or conan, as I do not recommend using the library in a productive environment (see below).

    Canonical usage example

    Let’s assume that we have a set of types representing different shapes. We can use a trait to model the behavior that all shapes have in common, such as calculating the area. This behavior can then be defined individually for each type and does not need to be part of the original type definition:

    #include <iostream>
    #include <numbers>
    #include <vector>
    
    #include "traits.h"
    using namespace traits;
    
    struct Circle {
        double radius{0.0};
    };
    
    struct Square {
        double length{0.0};
    };
    
    constexpr auto Shape = trait{
        TRAITS_METHOD(area, double() const),
    };
    
    constexpr auto get(impl_for<Shape, Circle>) {
        return "area"_method = [](Circle const& circle) {
            return std::numbers::pi * circle.radius * circle.radius;
        };
    }
    
    constexpr auto get(impl_for<Shape, Square>) {
        return "area"_method = [](Square const& square) {
            return square.length * square.length;
        };
    }
    
    int main() {
        std::vector<some<Shape>> someShapes;
    
        someShapes.emplace_back(Circle{1.0});
        someShapes.emplace_back(Square{1.0});
    
        for (auto const& shape : someShapes)
            std::cout << "Shape with area " << shape.area() << "\n";
    }

    Polymorphism is probably used too often. Nevertheless, it remains a useful concept for numerous use cases. Unfortunately, the standard approach to runtime polymorphism in C++ has some disadvantages, as many have already pointed out.

    For example, polymorphism via inheritance breaks value semantics and typically forces you to use dynamic memory management. This not only harbors risks for unsafe code (e.g. in the case of ignorance of modern language concepts), but above all leads to unnecessary complexity.

    This project was primarily intended as a personal learning experience:

    • I wanted to explore ways to avoid accidental complexity
    • I wanted to deepen my understanding of cross-language concepts and their implementation in other languages
    • I wanted to become more familiar with current C++ features and learn techniques that are useful for other tasks

    While I am very happy with the outcome, the resulting code is not yet ready for production and probably never will be.

    Caution

    You should NOT use this library in productive environments.

    In general, it is a bad idea to implement such a feature at the library level:

    • The implementation is very complex and therefore difficult to maintain
      • Only works with the help of (a few) macros
      • Various workarounds for compiler bugs and language restrictions
      • Probably also some serious bugs in the implementation
    • Often really bad error messages (not only but also because of the macros)
    • Poor compilation times and some annoying compiler warnings
    • Bad debugging experience
    • No additional support from the IDE
    • Only some of these problems could be mitigated, e.g. through precompiled traits

    Such library-level implementations ultimately highlight the current weaknesses of C++ and hopefully increase the incentives for the C++ committee to address these shortcomings in the language itself, as they emphasize the community’s need for such features.

    This implementation shows once again that polymorphism can be easily combined with value semantics. In many cases, this reduces the amount of code that deals with dynamic memory allocation and thus potentially unsafe code. Ultimately, developers can concentrate more on the what and not on the how.

    Related projects

    There have been some exciting projects dedicated to this topic for a long time:

    But new implementations are also emerging more recently:

    Ideas for offering this feature at the language level seem to make the most sense:

    You might also take also a look at the rust documentation to get familiar with the basic idea of traits. Some explanations from there have been included in this documentation.

    CMake version 3.24 or higher is required to build the library.

    Family Minimum version Required flags
    clang 16.0.0 -std=c++20
    gcc 13.3 -std=c++20
    MSVC 19.34 /std:c++20

    Using the library … step by step

    A trait defines the functionality a particular type has and can share with other types. We can use traits to define shared behavior in an abstract way.

    Tip

    All of the code below can be found in the example. To keep this overview compact, definitions that have already been used in previous examples are not repeated. It is therefore highly recommended that you read all the examples in sequence.

    traits allow you to define shared behavior with a declarative syntax

    A type’s behavior consists of the methods we can call on that type.

    constexpr auto WithAuthor = trait
    {
        Method<"author", std::string() const>
    };

    Every method is uniquely identified by its signature, which consists of a name and a function type.

    A type that supports this trait must therefore offer a method with exactly this signature. With the help of a special target type it is also possible to explicitly mention the target object in the signature, i.e.

    constexpr auto WithAuthor = trait
    {
        Method<"author", std::string(target const& self)>
    };

    is an equivalent definition of the WithAuthor trait. This syntax is more explicit and is also more similar to the syntax for trait implementations, but is also more verbose.

    Important

    Method<> refers to a predefined variable template. To be able to use this syntax, you must first make exactly the same method name available for the traits library with the help of a macro that is used in the global namespace.

    TRAITS_METHOD_DECLARATION(author);

    There is an alternative syntax for defining traits without having to declare a method name first.

    constexpr auto WithSummary = trait
    {
        TRAITS_METHOD (summary, std::string() const) // no previous declaration of 'summary' necessary
    };

    Tip

    Please always pay attention to the canonical spelling of method names. For example, no extra spaces should appear in overloaded operators.

    traits can be used to constrain generic types (static polymorphism)

    Different types share the same behavior if we can call the same methods on all of those types.

    Instead of …

    decltype (auto) operator<< (std::ostream& stream, auto const& drawable)
    requires requires { { drawable.draw(stream) } -> std::same_as<void>; }
    {
        drawable.draw (stream);
        return stream;
    }

    … or …

    template <typename T>
    concept Drawable = requires (T drawable, std::ostream& stream) { { drawable.draw(stream) } -> std::same_as<void>; };
    
    decltype (auto) operator<< (std::ostream& stream, Drawable auto const& drawable)
    {
        drawable.draw (stream);
        return stream;
    }

    … you can use a trait like the one in the initial example above:

    decltype (auto) operator<< (std::ostream& stream, is<Drawable> auto const& drawable)
    {
        drawable.draw (stream);
        return stream;
    }
    
    auto drawCircle ()
    {
        std::cout << Circle{3.0};
    }

    is<'trait'> is a C++ concept provided by the library that checks the type without const or volatile modifiers and as a non-reference type (i.e. the result of std::remove_cvref_t). This makes it easier to use this concept for forwarding references.

    traits can have multiple behaviors

    Trait definitions are a way to group method signatures together to define a set of behaviors necessary to accomplish some purpose.

    constexpr auto Runnable = trait
    {
        Method<"start", void()>,
        Method<"stop", void()>,
    
        Method<"isRunning", bool() const>,
    };
    
    void run (is<Runnable> auto& runnable)
    {
        if (not runnable.isRunning())
        {
            runnable.start ();
    
            // ...
    
            runnable.stop ();
        }
    }

    traits support overloaded methods

    constexpr auto OverloadedConstness = trait
    {
        Method<"bar", void() const>,
        Method<"bar", void()>,
    };
    
    constexpr auto OverloadedArgumentType = trait
    {
        Method<"bar", void(float value)>,
        Method<"bar", void(double value)>,
    };
    
    constexpr auto OverloadedValueCategory = trait
    {
        Method<"bar", void(int const& lvalue)>,
        Method<"bar", void(int& lvalue)>,
        Method<"bar", void(int&& rvalue)>,
    };
    
    constexpr auto OverloadedArity = trait
    {
        Method<"bar", void(bool value)>,
        Method<"bar", void()>,
    };

    traits support (certain) overloaded operators

    constexpr auto Callback = trait
    {
        Method<"operator()", void()>,
    };
    
    void myAlgorithm (is<Callback> auto& eventProcessing)
    {
        // ...
    
        eventProcessing();
    
        // ...
    
        eventProcessing();
    
        //...
    }

    Tip

    The function call operator does not have to be declared separately with TRAITS_METHOD_DECLARATION(operator()).

    traits can be templated

    template <typename T>
    constexpr auto ValidatorFor = trait
    {
        Method<"check", bool(T const&) const>,
    };
    
    constexpr auto IntValidator = ValidatorFor<int>;

    traits are composable

    traits can be combined with + (this syntax is borrowed from Rust) …

    void print (std::ostream& out, is<WithAuthor + WithSummary> auto const& article)
    {
        out << std::format ("{} by {}\n", article.summary(), article.author());
    }

    … but they also support a boolean syntax:

    constexpr auto WithAuthorAndSummary = WithAuthor and WithSummary; // declare trait for later reuse

    traits support additional type constraints

    In contrast to rust, these traits support an optional constraint at the beginning of the parameter list.

    A constraint is a templated callable: <typename> () -> bool

    constexpr auto DefaultConstructible = [] <typename T> () { return std::is_default_constructible_v<T>; };

    A number of use cases are supported by constraints.

    constraints can check arbitrary type properties

    Sometimes you want to ensure not only the behaviors of a type, but also other characteristics.

    constexpr auto Empty = [] <typename T> () { return std::is_empty_v<T>; };
    
    constexpr auto StatelessAllocator = trait
    {
        Empty and DefaultConstructible,
    
        Method<"alloc", void* (std::size_t byteCount) const>,
        Method<"free" , void  (void* ptr) const>
    };

    constraints allow easy definition of derived constraints

    C++ concepts are not first class citizens at the moment:

    • you can’t pass them as template parameters
    • it is complicated to define derived concepts

    Look at this example:

    struct Any final
    {
        Any (auto&& value); // OOPS ... clashes with copy/move constructor


        // let's define a constructor which takes anything but ourselves instead
    
        // 1. this syntax is currently not allowed
        Any (not std::same_as<Any> auto&& value);
    
        // 2. this syntax is somewhat awkward
        Any (auto&& value) requires (not std::same_as<std::remove_cvref_t<decltype(value)>, Any>);
    
        // 3. this syntax requires explicit definition of another concept, see below
        Any (not_same_as<Any> auto&& value);
    };
    
    template <typename T, typename U>
    concept not_same_as = not std::same_as<std::remove_cvref_t<T>, U>; // sic! T might be deduced to a reference type

    On the other hand, with a constraint …

    template <typename U>
    constexpr auto SameAs = [] <typename T> () { return std::same_as<T, U>; };

    … we can define derived constraints as required, because they support all common boolean operators:

    struct Any
    {
        Any (is<not SameAs<Any>> auto&& value);
    };

    Note

    is<'constraint'> is equivalent to is<trait{'constraint'}>

    This check will work even when value will be deduced as reference type.

    constraints can be used to force strong(er) coupling

    It may be advantageous to manage all implementations of a trait in a class hierarchy because, for example, the IDE supports inheritance particularly well.

    template <typename Interface>
    constexpr auto DerivedFrom = [] <typename T> () { return std::derived_from<T, Interface>; };
    
    struct TestableMarker
    {        
    };
    
    constexpr auto Testable = trait
    {
        DerivedFrom<TestableMarker>, // make it easier to find all testable elements in the code base
    
        Method<"runTests", bool() const>,
    };

    constraints allow easy definition of variant types

    Given a simple constraint:

    template <typename... Types>
    requires (sizeof...(Types) > 1)
    constexpr auto OneOf = [] <typename T> () { return (... or std::same_as<T, Types>); };

    We can easily define variant types.

    void printArea (is<OneOf<Circle, Square>> auto shape)
    {
        if constexpr (std::same_as<decltype (shape), Circle>)
            std::cout << std::format ("Circle area = {}\n", std::numbers::pi * shape.radius * shape.radius);
        else
            std::cout << std::format ("Square area = {}\n", shape.length * shape.length);
    }

    And use them as expected.

    printArea (Circle{1.0});
    printArea (Square{2.0});

    Note

    There is a bug in the current MSVC compilers, so the constraint should actually be written as follows:

    // template <typename... Types>
    // requires (sizeof...(Types) > 1)
    // constexpr auto OneOf = [] <typename T> () { return (... or std::same_as<T, Types>); };
    
    template <typename... Types>
    requires (sizeof...(Types) > 1)
    struct one_of
    {
        template <typename T>
        constexpr auto operator() () const noexcept
        {
            return (... or std::same_as<T, Types>);
        }
    };
    
    template <typename... Types>
    requires (sizeof...(Types) > 1)
    constexpr auto OneOf = one_of<Types...>{};

    traits support default method implementations

    Sometimes it’s useful to have default behavior for some or all of the methods in a trait instead of requiring implementations for all methods on every type.

    constexpr auto Action = trait
    {
        Method<"run", bool()>,
    
        // many actions don't need initialization
        Method<"init", bool()> = [] ([[maybe_unused]] auto& action)
        {
            return true;
        },
    
        // cleanup neither
        Method<"cleanup", void()> = [] ([[maybe_unused]] auto& action)
        {
        }
    };

    However, instead of …

    auto run (is<Action> auto& action)
    {
        if (not action.init ()) // OOPS ... may not compile
            return false;
    
        const bool ok = action.run();
    
        action.cleanup (); // OOPS ... may not compile
        return ok;
    }

    … you’ll then have to write:

    auto run (is<Action> auto& action)
    {
        auto action_impl = as<Action> (action); // OR: trait_cast<Action> (action)
    
        if (not action_impl.init ())
            return false;
    
        const bool ok = action_impl.run();
    
        action_impl.cleanup ();
        return ok;
    }

    as<'trait'> (lvalue_ref) creates a reference wrapper which provides all trait behaviors as public API.

    Tip

    You should always access trait behaviors of an object via the reference wrapper (even when behaviors do not have a default implementation) because traits allow behaviors to be defined non-intrusively (see below).

    Now this code compiles and uses the given default implementations:

    struct SimpleAction
    {
        bool run ()
        {
            return true;
        }
    };
    
    auto runSimpleAction ()
    {
        auto action = SimpleAction{};
        return run (action);
    }

    traits allow you to implement behavior in a non-intrusive manner

    Given some type for which we want to support all Action behaviors from above …

    struct ForeignAction
    {
        enum class Status { Failed, Ok };
    
        auto execute ()
        {
            if (not ready)
                return Status::Failed;
    
            // ...
    
            return Status::Ok;
        }
    
        bool ready{false};
    };

    … we can provide an implementation of the Action trait in the same namespace (so ADL kicks in):

    constexpr auto get (impl_for<Action, ForeignAction>)
    {
        return impl
        {
            "run"_method = [] (ForeignAction& action) -> bool
            {
                return action.execute () == ForeignAction::Status::Ok;
            },
            "init"_method = [] (ForeignAction& action) -> bool
            {
                action.ready = true;
                return true;
            },
            "cleanup"_method = [] (ForeignAction& action) -> void
            {
                action.ready = false;
            }
        };
    }

    Note

    "..."_method is a user-defined string literal to make the code more readable. You can also use the Method<"..."> = syntax which is a bit more consistent with the trait definition syntax. However, make sure that you omit the parameter for the function type, as this is automatically derived.

    Important

    You must provide an implementation for all behaviors which do not already have a default implementation, but you can override a default behavior of course.

    Let’s test it:

    auto runForeignAction ()
    {
        auto action = ForeignAction{};
        return run (action);
    }

    A trait implementation is valid for all derived types, unless there is a more specialized implementation.

    struct DerivedForeignAction : ForeignAction
    {
    };
    
    auto runDerivedForeignAction ()
    {
        auto action = DerivedForeignAction{};
        return run (action);
    }

    Let’s give another example:

    struct Tweet
    {
        std::string user;
        std::string text;
    
        static auto getUser (Tweet const& tweet) { return tweet.user; }
        static auto getText (Tweet const& tweet) { return tweet.text; }
    };

    You can also use function pointers instead of lambdas.

    constexpr auto get (impl_for<WithAuthor, Tweet>)
    {
        return impl { "author"_method = &Tweet::getUser };
    }

    A slightly more compact syntax is also valid, because impl is only an optional wrapper to make the code more explicit.

    constexpr auto get (impl_for<WithSummary, Tweet>)
    {
        return "summary"_method = &Tweet::getText;
    }

    Tip

    The short syntax also works for multiple methods and lambda implementations.

    We can now use the type in a function that requires both traits.

    void post (is<WithAuthorAndSummary> auto const& message)
    {
        auto withAuthorAndSummary = as<WithAuthorAndSummary> (message);
        std::cout << std::format ("{}: {}\n", withAuthorAndSummary.author(), withAuthorAndSummary.summary());
    }
    
    auto postSomeTweet ()
    {
        post (Tweet{"@elonmusk", "X > Twitter"});
    }

    So far we’ve only talked about static polymorphism, but …

    traits work very well with runtime polymorphism

    Introducing … some<'trait'>

    some<> has value semantics like std::any, but offers a public API that is defined by the trait. You can think of some<> as generalization of std::any with std::any ~ some<trait{}>. some<> is implicit constructible from anything which implements the trait.

    auto onlyCheck (some<Action>& action)
    {
        if (not action.init ())
            return false;
    
        action.cleanup ();
        return true;
    }
    
    auto onlyCheckForeignAction ()
    {
        auto action = some<Action> {ForeignAction{}};
        return check (action);
    }

    Note

    Here we no longer use static polymorphism and provide a function template, but some<> erases the concrete type and we only define a single (exportable) function.

    Another example.

    struct FirstCallback
    {
        void operator () () {}
    };
    
    struct SecondCallback
    {
        void operator () () {}
    };
    
    auto invokeCallbacks ()
    {
        std::vector<some<Callback>> someCallbacks;
    
        someCallbacks.emplace_back (FirstCallback{});
        someCallbacks.emplace_back (SecondCallback{});
    
        for (auto& callback : someCallbacks)
            callback ();
    }

    Last example.

    struct Foo
    {
        void bar () {}
        void bar () const {}
        void bar (bool) {}
        void bar (int const&) {}
        void bar (int&) {}
        void bar (int&&) {}
        void bar (float) {}
        void bar (double) {}
    };
    
    auto fooBar ()
    {
        some<OverloadedConstness> overloadedConstness = Foo{};
    
        std::as_const (overloadedConstness).bar();
        overloadedConstness.bar();
    
        some<OverloadedArgumentType> overloadedArgumentType = Foo{};
    
        overloadedArgumentType.bar(1.0f);
        overloadedArgumentType.bar(1.0);
    
        some<OverloadedValueCategory> overloadedValueCategory = Foo{};
    
        int i = 0;
    
        overloadedValueCategory.bar(std::as_const (i));
        overloadedValueCategory.bar(i);
        overloadedValueCategory.bar(std::move (i));
    
        some<OverloadedArity> overloadedArity = Foo{};
    
        overloadedArity.bar(true);
        overloadedArity.bar();
    }

    Using the library … advanced concepts

    precise control of the memory requirements

    some<> offers the following customization options:

    • small buffer optimization
    • inlined methods

    unerasing some types

    If you ever need to unerase the type stored within a some<>, you can ask with .type() for the std::type_info and try a some_cast<Type> which behaves exactly like a std::any_cast<Type>.

    auto changeShape (some<OneOf<Circle, Square>> shape)
    {
        if (shape.type () == typeid (Circle))
            shape = Square { some_cast<Circle> (shape).radius / std::numbers::inv_sqrtpi };
        else
            shape = Circle { some_cast<Square> (shape).length * std::numbers::inv_sqrtpi };
    
        return shape;
    }
    
    auto changeShapeTest()
    {
        auto circle = Circle{1.0};
        printArea (circle);
    
        auto square = some_cast<Square> (changeShape (circle));
        printArea (square);
    
        auto circleAgain = some_cast<Circle> (changeShape (square));
        printArea (circleAgain);
    }

    explicit support for variant types

    For a number of reasons, it makes sense to explicitly support some<> variant types and offer an alternative to std::variant:

    • if you want to centrally define not only the possible types, but also the possible behaviors on these types
    • if you want to implement the variant behaviors separately for each type
    • if you require a different storage model for your variant type

    some_variant<'Types'...> is a type alias for a specially constrained some<> that can be used as a replacement for std::variant.

    some<> provides a visit() overload for this purpose:

    void printCircumference (some_variant<Circle, Square> const& shape)
    {
        visit (overload // famous overload pattern
        {
            [] (Circle const& circle)
            {
                std::cout << std::format ("Circle circumference = {}\n", std::numbers::pi * 2.0 * circle.radius);
            },
            [] (Square const& square)
            {
                std::cout << std::format ("Square circumference = {}\n", 4.0 * square.length);
            }
        }, shape);
    }
    
    auto printCircumferenceOfShapes ()
    {
        printCircumference (Circle{1.0});
        printCircumference (Square{2.0});
    }

    some_variant<> provides no dedicated API other than visit(). The size of a some_variant<> is large enough to store all alternatives inplace.

    However, you can also define some_variant<>s with additional constraints, expected behaviors or customized storage. some<> offers a special type alias template variant for this purpose:

    constexpr auto WithType = trait
    {
        Method<"type", std::string () const>
    };
    
    using Shape = some<WithType>::variant<Circle, Square>;
    
    constexpr auto get (impl_for<WithType, Circle>)
    {
        return "type"_method = [] (Circle const&) -> std::string { return "Circle"; };
    }
    
    constexpr auto get (impl_for<WithType, Square>)
    {
        return "type"_method = [] (Square const&) -> std::string { return "Square"; };
    }
    
    void printType (Shape const& shape)
    {
        std::cout << std::format ("Type = {}\n", shape.type ());
    }
    
    auto printName ()
    {
        printType (Circle{1.0});
        printType (Square{2.0});
    }

    Tips for use

    Since traits are essentially used within is<...>, the trait names should be chosen appropriately to maintain a natural reading flow. For this reason, a noun or the paraphrase with … behavior instead of has … behavior is used in all examples .

    Implementation notes

    The implementation uses snake case for all concepts, types and type aliases. CamelCase is used for all global variables.

    The current implementation defines the following C++ concepts:

    • function_type: a function signature
    • callable: a valid std::function target
    • method_id: a unique identifier for a method
    • constraint: a test for any type attributes
    • behavior: a certain behavior
    • behavior_implementation: an implementation of a behavior
    • is: a type supports a specific trait

    The following types are used in the implementation:

    • method_name: unique name of a method
    • method_signature<method_name, function_type> is the only implementation of the method_id concept
    • method_implementation<method_id, callable> is the only implementation of the behavior_implementation concept

    Open issues

    Here is a list of possible API improvements, in no particular order:

    • traits: you must define an empty implementation of a trait, even if all methods have default implementations
    • constraints: add support for all boolean operators
    • behaviors: add support for more overloaded operators, esp. operator<<
    • function types: add support for noexcept
    • function types: add support for volatile
    • some<>: always has a value; use optional<some<>> instead or introduce maybe_some<>
    • some<>: add conversion from some<> other type
    • some<>: improve syntax for inlined methods

    Here is a list of possible implementation improvements, in no particular order:

    • fix internal linkage warning
    • remove dependency to std::tuple
    • remove dependency to std::variant
    • do not use unnamed inline namespaces
    • move method_kernel into method_name ?
    • hide non-public stuff in a detail namespace
    • better check for canonical method names
    • tests: check macro syntax with method inlining and trait implementations
    • document ADRs

    Known limitations

    Here is a list of known problems:

    • clang generates a warning for unused traits, so they must be annotated with [[maybe_unused]] or the warnings must be suppressed in some other way

    License

    traits is BSD-3 licensed, as found in the LICENSE file.

    Visit original content creator repository https://github.com/VolumeGraphics/traits